We're an Embedded Award 2026 Tools nominee and would love your support! Vote for C/C++test CT >>
Parasoft Blog


Apart from helping developers implement unit testing in Java and improve programming speed, JUnit testing offers many benefits. In this post, you'll be taken through these benefits and why you should use JUnit testing for your development.
Jump to Section
It’s been a few years since the release of JUnit 5. If you haven’t started using it for your development testing yet, you should. JUnit 5 comes with a multitude of new features and improvements that can save you time and headaches. Let’s take a look at how to get started with JUnit 5 to reap the benefits of the latest technology.
If you’ve been using JUnit 4 for a while, migrating tests may seem like a daunting task. The good news is that you probably don’t need to convert any tests—JUnit 5 can run JUnit 4 tests using the Vintage library, so you can just start writing new tests with JUnit 5.
Here are four solid reasons to start using JUnit 5:
Switching from JUnit 4 to JUnit 5 is quite simple, even if you have existing JUnit 4 tests. Most organizations don’t need to convert old JUnits to JUnit 5 unless new features are needed.
JUnit 5 tests look mostly the same as JUnit 4, but there’s a few differences you should be aware of.
JUnit 5 uses the new org.JUnit.jupiter package for its annotations and classes. For example, org.JUnit.Test becomes org.JUnit.jupiter.api.Test.
The @Test annotation no longer has parameters; each of these has been moved to a function. For example, to indicate that a test is expected to throw an exception in JUnit 4:

In JUnit 5, this has changed to:

Similarly, timeouts have changed. In JUnit 4, they looked like this:

In JUnit 5, timeouts looks like this:

Here are other annotations that have changed:
JUnit 5 assertions are now in org.JUnit.jupiter.api.Assertions. Most of the common assertions, like assertEquals() and assertNotNull() look the same as before, but there are a few key differences:
Note that you can continue to use assertions from JUnit 4 in a JUnit 5 test if you prefer.
Assumptions have been moved to org.JUnit.jupiter.api.Assumptions.
The same assumptions exist, but now support BooleanSupplier as well as Hamcrest matchers to match conditions. Lambdas can be used (of type Executable) for code to execute when the condition is met.
Here’s an example in JUnit 4:

In JUnit 5, it becomes this:

In JUnit 4, customizing the framework generally meant using a @RunWith annotation to specify a custom runner. Using multiple runners was problematic, and usually required chaining or using a @Rule. This has been simplified and improved in JUnit 5 using extensions.
For example, building tests with the Spring framework looked like this in JUnit 4:

With JUnit 5, you include the Spring Extension instead:

The @ExtendWith annotation is repeatable, meaning that multiple extensions can be combined easily.
You can also define our own custom extensions easily by creating a class which implements one or more interface from org.JUnit.jupiter.api.extension, and then adding it to our test with @ExtendWith.
To convert an existing JUnit 3 or JUnit 4 test to JUnit 5, the following steps should work for most tests:
Note that migrating parameterized tests will require a little more refactoring, especially if you have been using JUnit 4 Parameterized (the format of JUnit 5 parameterized tests is much closer to JUnitParams).
So far, I’ve discussed only existing functionality and how it has changed. But JUnit 5 offers plenty of new features to make our tests more descriptive and maintainable.
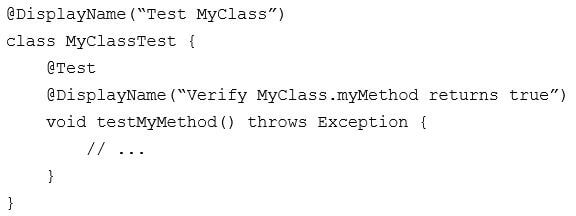
With JUnit 5, you can add the @DisplayName annotation to classes and methods. The name is used when generating reports, which makes it easier to describe the purpose of tests as well as tracking down failures, for example:

You can also use a display name generator to process your test class and/or method to generate test names in any format you like. See the JUnit documentation for specifics and examples.
JUnit 5 introduced some new assertions, such as:
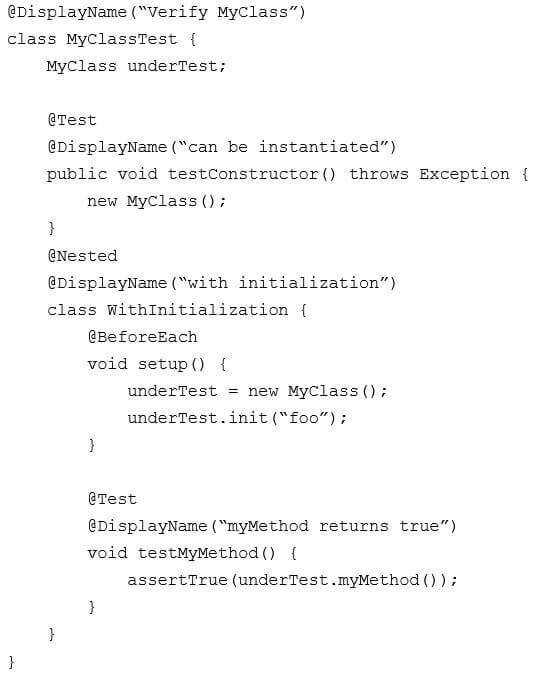
Test suites in JUnit 4 were useful, but Nested tests in JUnit 5 are easier to set up and maintain, and they better describe the relationships between test groups, for example:

In the example above, you can see that I use a single class for all tests related to MyClass. I can verify that the class is instantiable in the outer test class, and I use a nested inner class for all tests where MyClass is instantiated and initialized. The @BeforeEach method only applies to tests in the nested class.
The @DisplayNames annotations for the tests and classes indicate both the purpose and organization of tests. This helps to understand the test report because you can see the conditions under which the test is performed (Verify MyClass with initialization) and what the test is verifying (myMethod returns true). This is a good test design pattern for JUnit 5.
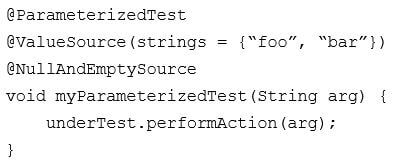
Test parameterization existed in JUnit 4 with built-in libraries like JUnit4Parameterized or third-party libraries like JUnitParams. In JUnit 5, parameterized tests are completely built in and adopt some of the best features from JUnit4Parameterized and JUnitParams, for example:

The format looks like JUnitParams, where parameters are passed to the test method directly. Note that the values to test with can come from several different sources. Here, I just have a single parameter so it’s easy to use a @ValueSource. @EmptySource and @NullSource to indicate that I want to add an empty string and a null to the list of values to run with, respectively (and you can combine them, as above, if using both). There are multiple other value sources, such as @EnumSource and @ArgumentsSource (a custom value provider). If you need more than one parameter, you can also use @MethodSource or @CsvSource. See the JUnit 5 documentation for more details and examples.
Another test type added in JUnit 5 is @RepeatedTest, where a single test is repeated a specified number of times.
JUnit 5 provides the ExecutionCondition extension API to enable or disable a test or container (test class) conditionally. This is like using @Disabled on a test but it can define custom conditions. There are multiple built-in conditions, such as:
Test templates are not regular tests. They define a set of steps to perform, which can then be executed elsewhere using a specific invocation context. This means that you can define a test template once, then build a list of invocation contexts at runtime to run that test with. Find more details and examples in the Junit 5 documentation.
Dynamic tests are like test templates—the tests to run are generated at runtime. However, while test templates are defined with a specific set of steps and run multiple times, dynamic tests use the same invocation context but can execute different logic. One use for dynamic tests would be to stream a list of abstract objects and perform a separate set of assertions for each based on their concrete types. For good examples, see the Junit 5 documentation.
JUnit 5 is a powerful and flexible update to the JUnit framework. It provides a variety of improvements and new features to organize and describe test cases, as well as help in understanding test results. Updating to JUnit 5 is quick and easy—just update your project dependencies and start using the new features.